 Collaboration & Sharing
Collaboration in a Shared Virtual Environment
Contents
- Common Challenges of Networking
- Networking Libraries
- Exercise: Creating a Shared Application in Photon
- Testing on one PC
- Example Application with a Shared Environment: VIAProMa
Synchronous collaboration in Mixed Reality is possible in a shared virtual environment. This means that the shown 3D objects are synchronized between the participants and changes are broadcast in real-time. As an example, if one participant picks up an object and moves it around, the other members of the shared environment should be able to perceive the motion of the object accurately and with a low latency. There are a few considerations that need to be made in order to successfully realize such a system.
Common Challenges of Networking
A series of common challenges can occur in the implementation of a shared environment.
- Network traffic: To synchronize data between participants, messages have to be exchanged over the network. With a rising number of participants, the number of messages also rises which increases the network load and the load on any central servers. To reduce the network traffic, developers should aim to minimize the number of sent information (Photon Optimization). For instance, some information can be reconstructed locally from other shared data. We will see an example of this with the colouring of game pieces in the tutorial of this chapter.
- Unreliable connection: Packages are not guaranteed to reach their receiver if a client has a poor internet connection. Moreover, the order in which packages are sent does not have to correspond to the order in which packages arrive at the receiver (Claypool & Claypool, 2010). The networking library has to account for this.
- Session & User management: In an office building not all people want to communicate with every other person at the same time. The building is separated into floors and offices so that meetings only contain a limited amount of participants. Similarly, people who connect to the shared environment not always want to see every other connected person. Instead, the networking solution needs to manage sessions which can happen in parallel and where a limited number of participants can take part in a closed meeting.
- Permissions: To stick with the building metaphor, not all people in a building should be allowed to enter any office. Similarly, sessions should be closed to some participants or can only access a session if they are invited.
- Conflict handling: In a shared environment, multiple users can perform actions at the same time. This can lead to conflicts, e.g. if two people alter the same object in parallel. The networking library needs to account for this and either forbid parallel actions on the same object or resolve such conflicts.
- Movement smoothing: To save network traffic, the position of an object is not broadcast every single frame but in larger intervals. If the receiving client just updates the position of the object to the values given in the latest package, the user will see the object teleport along the path instead of a smooth movement. To solve this, the implementation should interpolate between the received positions. There is a trade-off between the smoothness and the latency. If a package is received, this means that the object should be at the received position. But with a naive interpolation between the last position and the most-recently received position, the object can only start moving towards this position now. This means that the object is always one package behind. A more advanced solution is to also broadcast the velocity vector of the object. With the direction and speed that the object is currently moving, the receiving client can anticipate the next position by extrapolating the object’s position along this trajectory. When the next package arrives, the position is corrected.
- Consistency-throughput: Latency is the natural enemy of sharing states across devices, preventing keeping states consistent, if the frequency of change and the number of changing nodes becomes too large. Communication delays from frequent state changes further impede the state change updates of the other nodes. “Latency hiding”, i.e., precomputing predicted states and sending them right in time for just-in-time, is a way around this, if combined with “self-healing” to take account of “suprise-injected events” (Peitso & Michael, 2020).
With poor connection, networked applications can show a series of common effects. Developers need to be aware of them and know how they are produced.
- Teleporting: If packages are lost, e.g. due to a poor internet connection, the data on remote clients is not updated. Especially for moving objects this can be a problem. Remote clients will see the object in the same spot for a longer time and after that, it will suddenly jump to its current position. This “teleporting” action is unexpected by the user.
- Rubber-banding: With the described interpolation method which also works with the velocity vector of the object, an effect called “rubber-banding” can occur. It means that objects do not immediately react to large accelerations or decelerations but instead keep moving, before bouncing back to their true position. We will look at this effect in a 1D example: There is an object which can only move left or right. It is moved on sender S and there is a receiver R. We assume one-way communication where the sender tells R about the updated positions. We will ignore the connection architecture and any network delay. This means that we can simply assume that an object which is sent at time point t by the sender is also received by the receiver at point t. At time point 0, a package is sent. It describes that the object is currently at position 0 and has a speed of 5. The package is received by r. It places the object at position 0 and starts moving it so that it will be at position 5 at time step 1. At time step one, S tells R that the object has actually moved to position 5 and still has a velocity of 5. R now gradually moves the object from position 5 to position 5 + 6 = 11 in a way that it will arrive at 11 at time point 2. At time step 2.5, the object comes to an abrupt halt on S at position 8. However, this is not immediately told R because packages are only sent at full time steps. So, at time step 3, S sends that the object is at position 8 with a speed of 0. But R has already moved the object to position 11 and now has to move it back to 8 in the next time interval. To the user which views the object on R this seems like a rubber-band effect since the object overshoots the target position before being pulled back to the point where it came to a halt.
Unity Networking Libraries
Unity had its own network library called UNET, however it is now deprecated. Therefore, developers need to look at other networking solutions.
Photon
Photon is one alternative to realize collaborative applications in Unity. It is a commercial product suite by Exit Games which provides a free plan for up to 20 concurrent users and up to 500 messages per second. The sharing functionality can be realized using the Photon PUN2 library. Moreover, Photon provides further libraries for collaboration, e.g. to realize a text chat or a voice chat.
 Creating a Shared Application in Photon
In this exercise, we will create the game Draughts (also known as Checkers). This sample app will provide a way for two remote users to move playing stones on a board so that both participants can see each other’s moves. We will not implement the rules of the game in this exercise. Instead, the app provides the shared pieces and relies on players to move them according to the rules. If you want, you can implement rules, e.g. move restrictions once you completed the exercise.
This exercise is split into five sections. The first part will demonstrate how the Unity project is created and how the necessary libraries can be imported. After that, the base logic of the draughts game is created. The third part demonstrates the setup of a shared environment for remote players. It will demonstrate how to set up a room system where content is only shared between users in one room and where multiple rooms can exist in parallel. In the fourth part, we will look at a basic way of implementing the shared logic using serializers. The last part presents an alternative way for sending data over the network using Remote Procedure Calls (RPCs).
1 - Setting up the Project
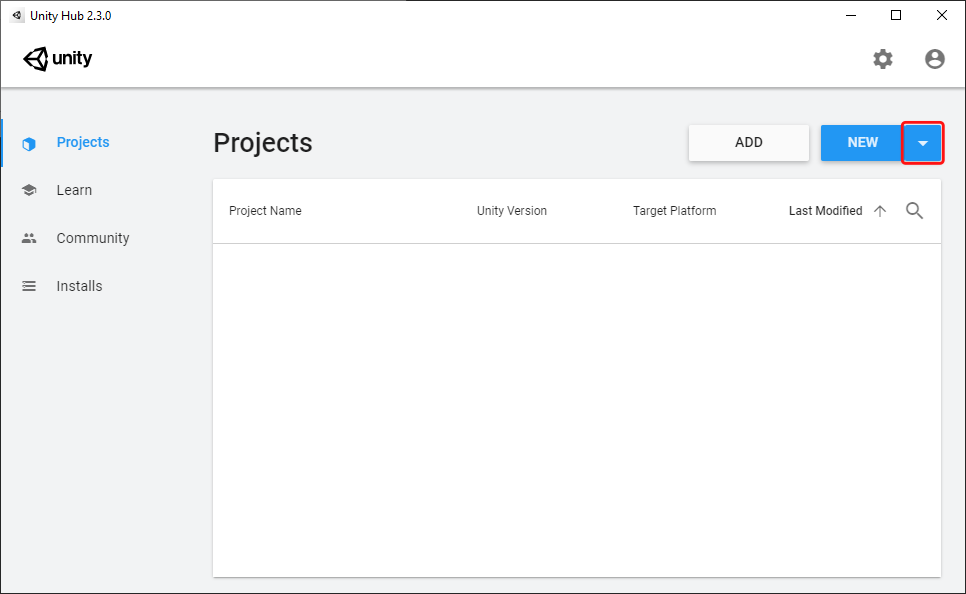
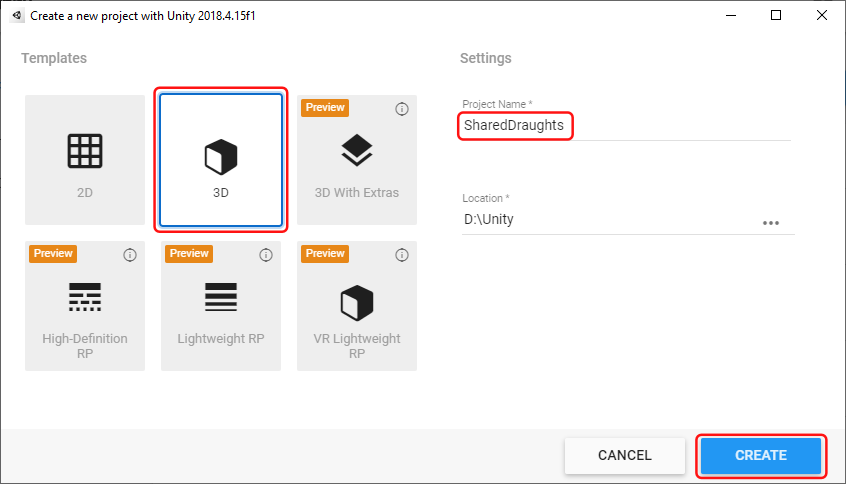
- Create a new Unity project with the name “SharedDraughts” which uses the default 3D template. In this exercise, we are using Unity 2018.4 because it is the current long-term support version that is compatible with the Mixed Reality Toolkit. If you are using the Unity Hub, you can select which Unity version should create the project by clicking on the down arrow on the New button.
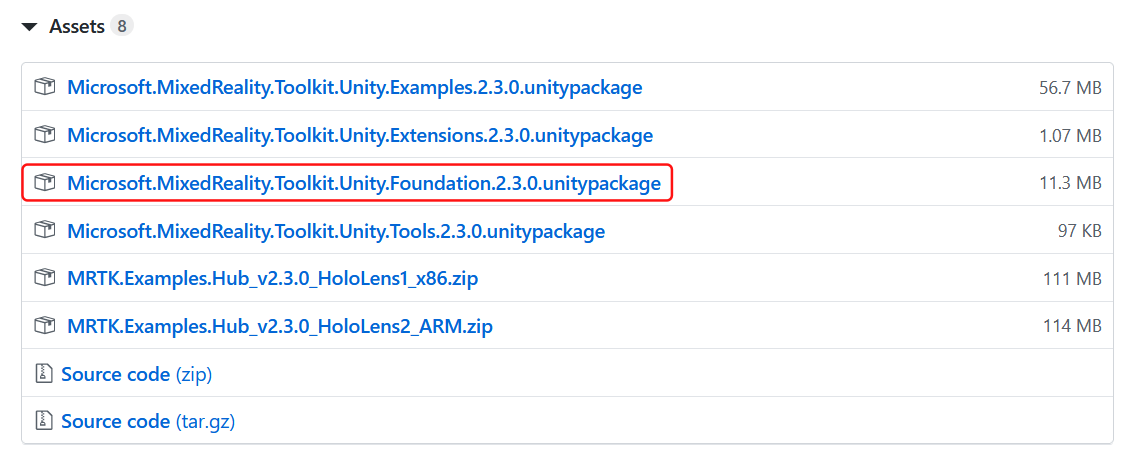
2.Download the Mixed Reality Toolkit. Go to the releases of the Mixed Reality Toolkit on GitHub and scroll to the latest version which is not marked as a pre-release. We are using the release Microsoft Mixed Reality Toolkit v2.3.0. In the Assets section of the release, download the Unity-package which has Foundation in its name as this is the base package. In our case, it is called * Microsoft.MixedReality.Toolkit.Unity.Foundation.2.3.0.unitypackage*.
3.Import the Mixed Reality Toolkit. To do this, select the project panel in Unity and perform a right-click in Unity’s Asset Browser. Select Import Package > Custom Package from the context menu.
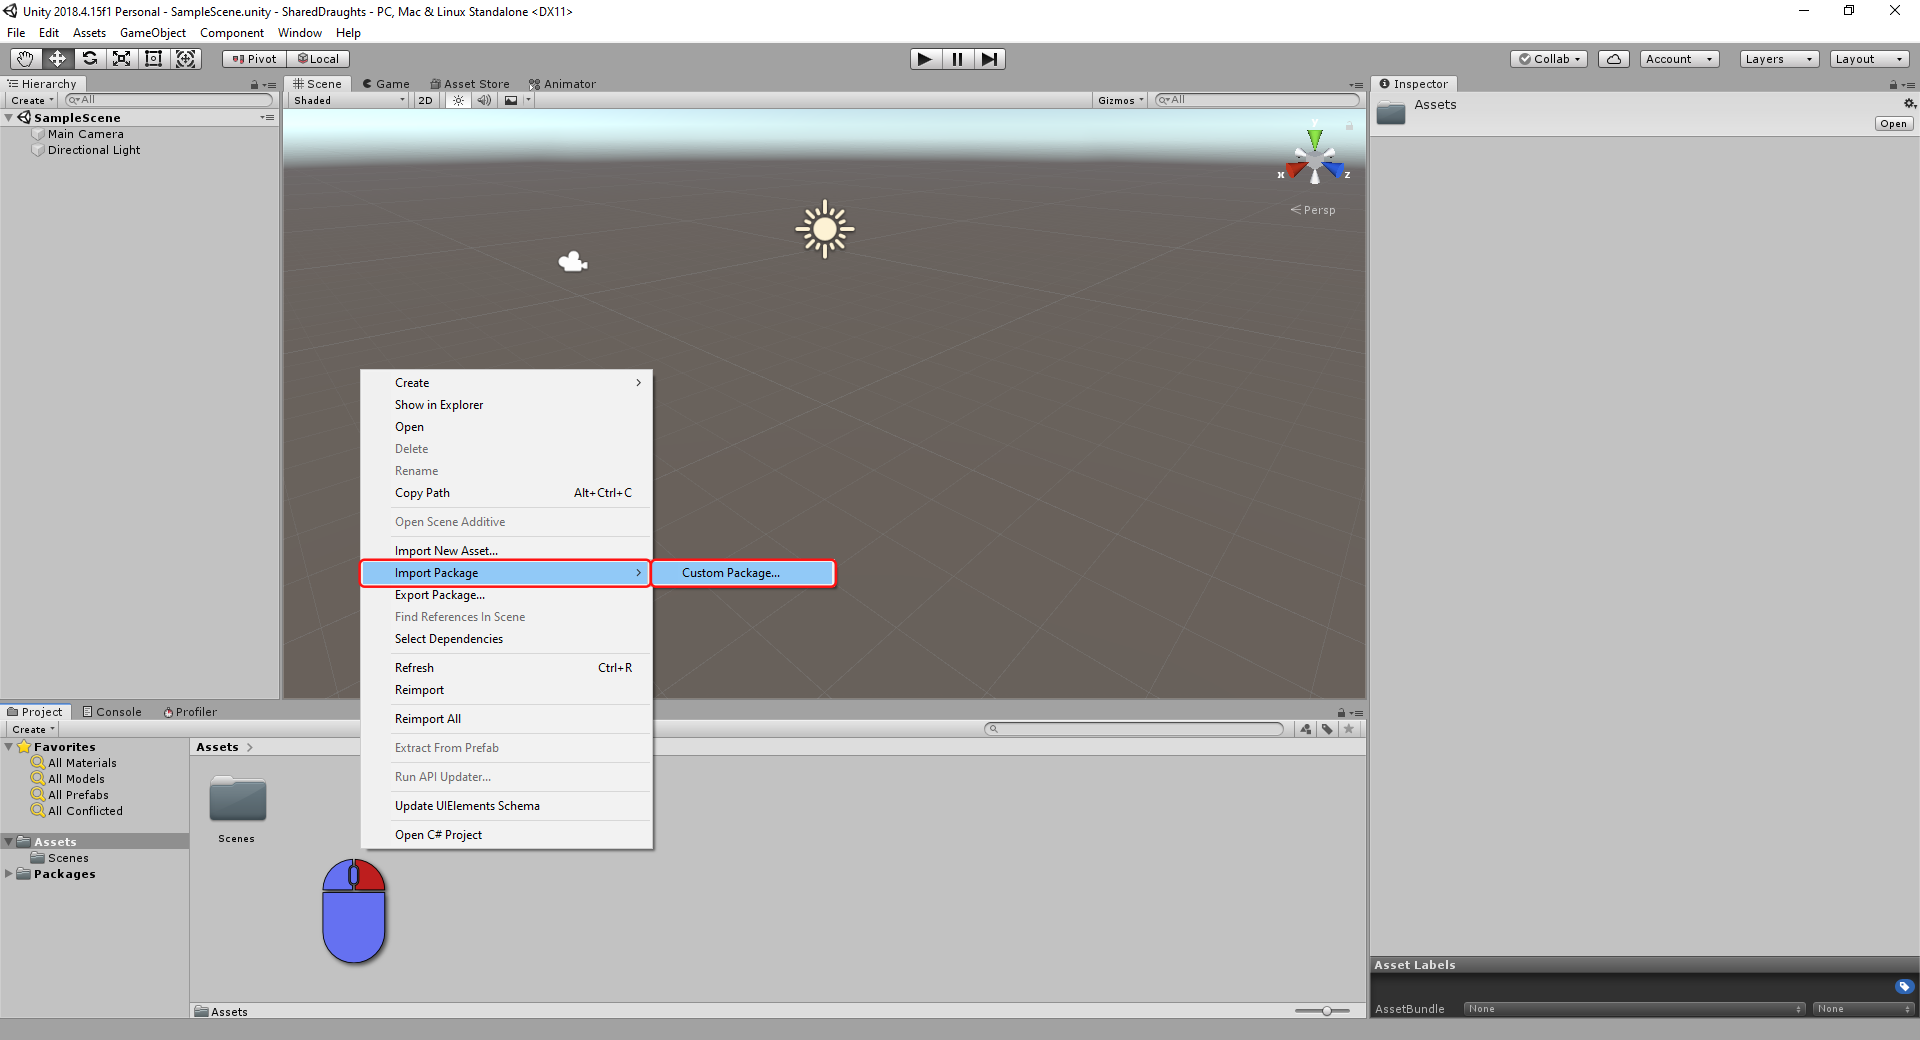
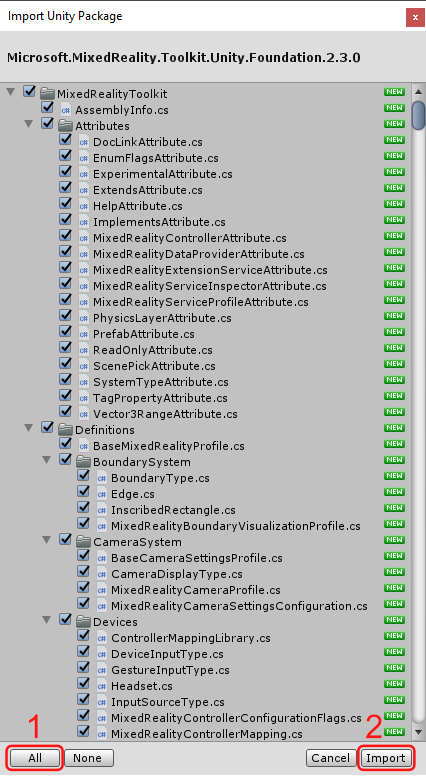
After that, select the Unity-package that you just downloaded in the opened file explorer and click Open. Unity will prepare the Unity-package for the import. Next, a dialogue will be shown which allows you to select which content should be imported. Click All to make sure that everything is selected and then press Import.
Once the import has finished, you will find the new folders of the Mixed Reality Toolkit in your assets.
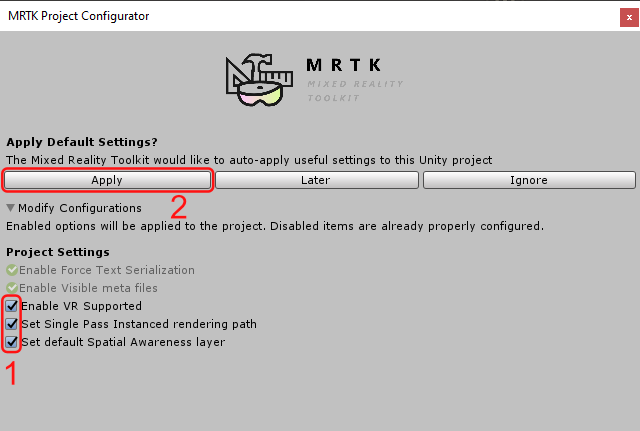
4.After the import, a configuration window will automatically open. It states that the Mixed Reality Toolkit would like to apply some settings to prepare the Unity project for Mixed Reality development. Make sure that every recommendation in the list is checked and then click Apply.
5.The next step is to prepare the import of the Photon library. Each application that uses Photon needs an AppId which is coupled with an account. Go to Photon’s homepage and create an account by clicking Sign in in the top right and then selecting Don’t have an account? Create one….
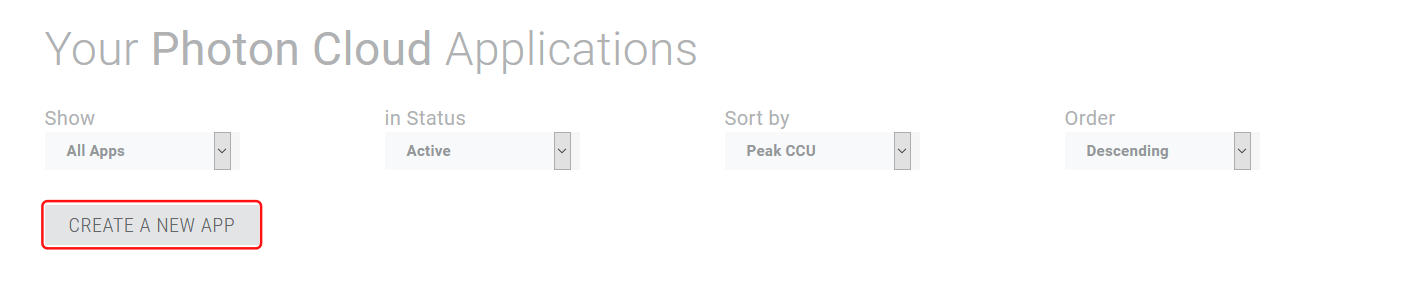
6.After the registration you are on a dashboard where you can administer your Photon applications. Click on the button CREATE A NEW APP.
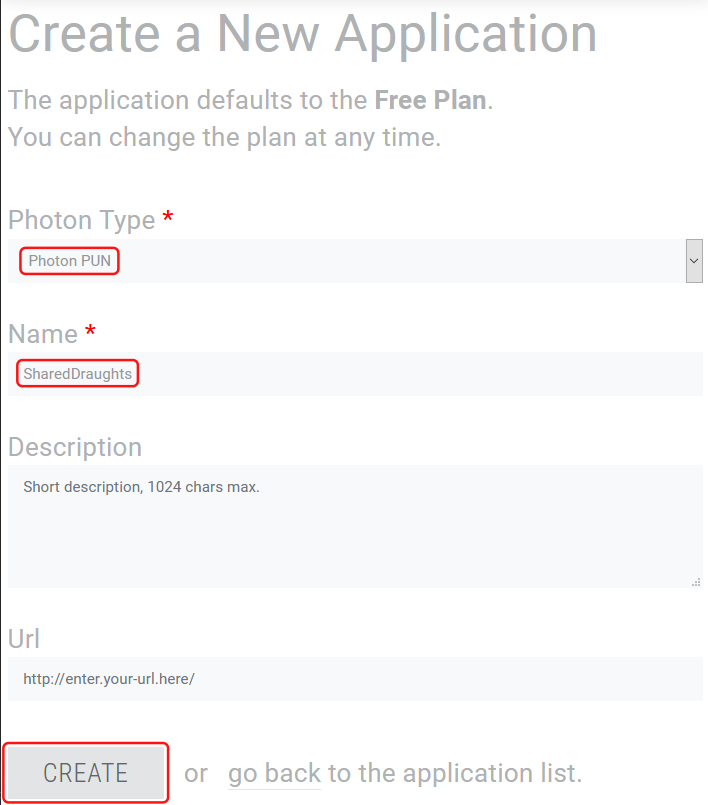
7.On the next screen, you will be asked to enter the information about the new application. Set the type to Photon PUN since we will work with Photon’s PUN library. Additionally, give the app a descriptive name, e.g. “SharedDraughts”. You can also add a description if you want so that it becomes easier to identify the app later. When you are done, click the CREATE button.
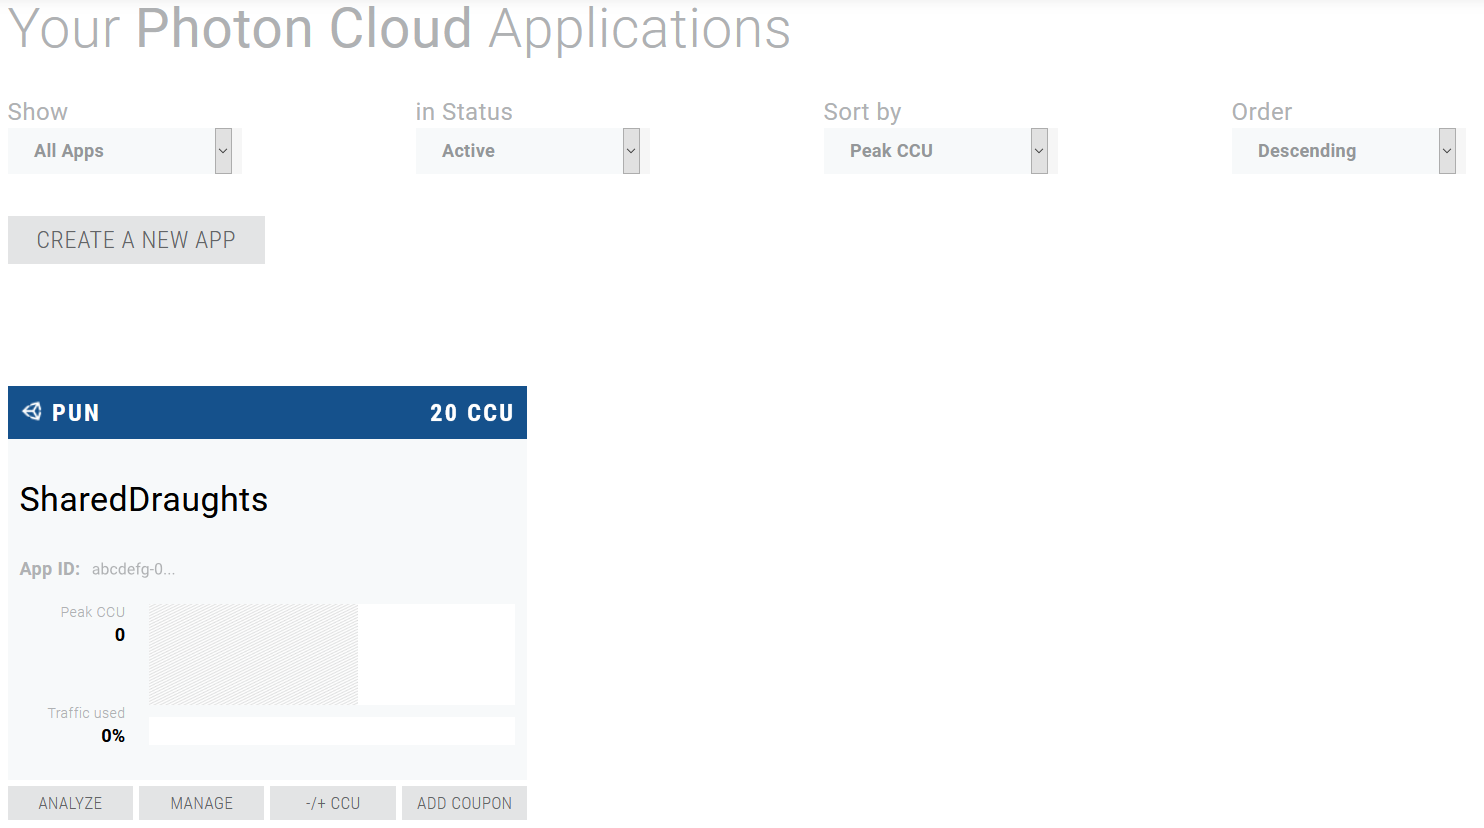
8.You will now be directed back to the Photon dashboard where a new panel has appeared with the name of your application. Here, you can get the AppID of the application and look at its usage statistics.
9.Next, we are going to import the Photon library in Unity so that we can create a networked application.
In Unity, go to Window > Asset Store or press Ctrl + 9 to open the asset store window.
Make sure that you are signed in with a Unity account so that you can download resources from the asset store.
If you are not signed in, there is a Sign in button at the top right of the asset store panel.
Search for “Pun 2 - FREE” and select it.
Click on the blue Add to My Assets button.
Once this is done, the button’s caption will change to Import and you can click the button again to import the asset.
Just like the Unity-package of the Mixed Reality Toolkit, Unity now displays a dialogue window where you can select which resources you want to import.
Select everything and click the Import button in the dialogue.
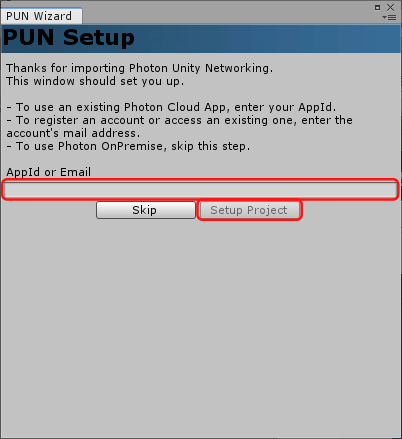
10.Once the import has finished, PUN will automatically open a pop-up window where you can enter the AppID that we generated previously. To do so, go back to the browser and copy your full AppID that we generated. The dashboard only shows a cut-off preview of the AppID. Click on the app ID and the full ID will be shown. It is automatically highlighted so that you can copy it. Enter the ID in the text field of the opened window in Unity.
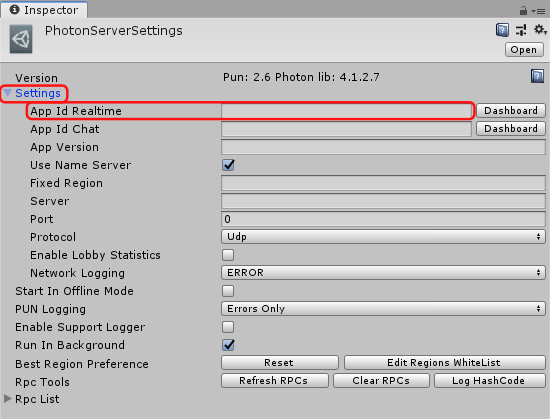
If you have accidentally closed the window or pressed Skip, you go to Window > Photon Unity Networking > Highlight Server Settings. In the inspector, you can enter the AppID in the Settings section under AppID Realtime
2 - Creating the Draughts Game Elements
We have finished the project setup and can now start with setting up the pieces of the Draughts game.
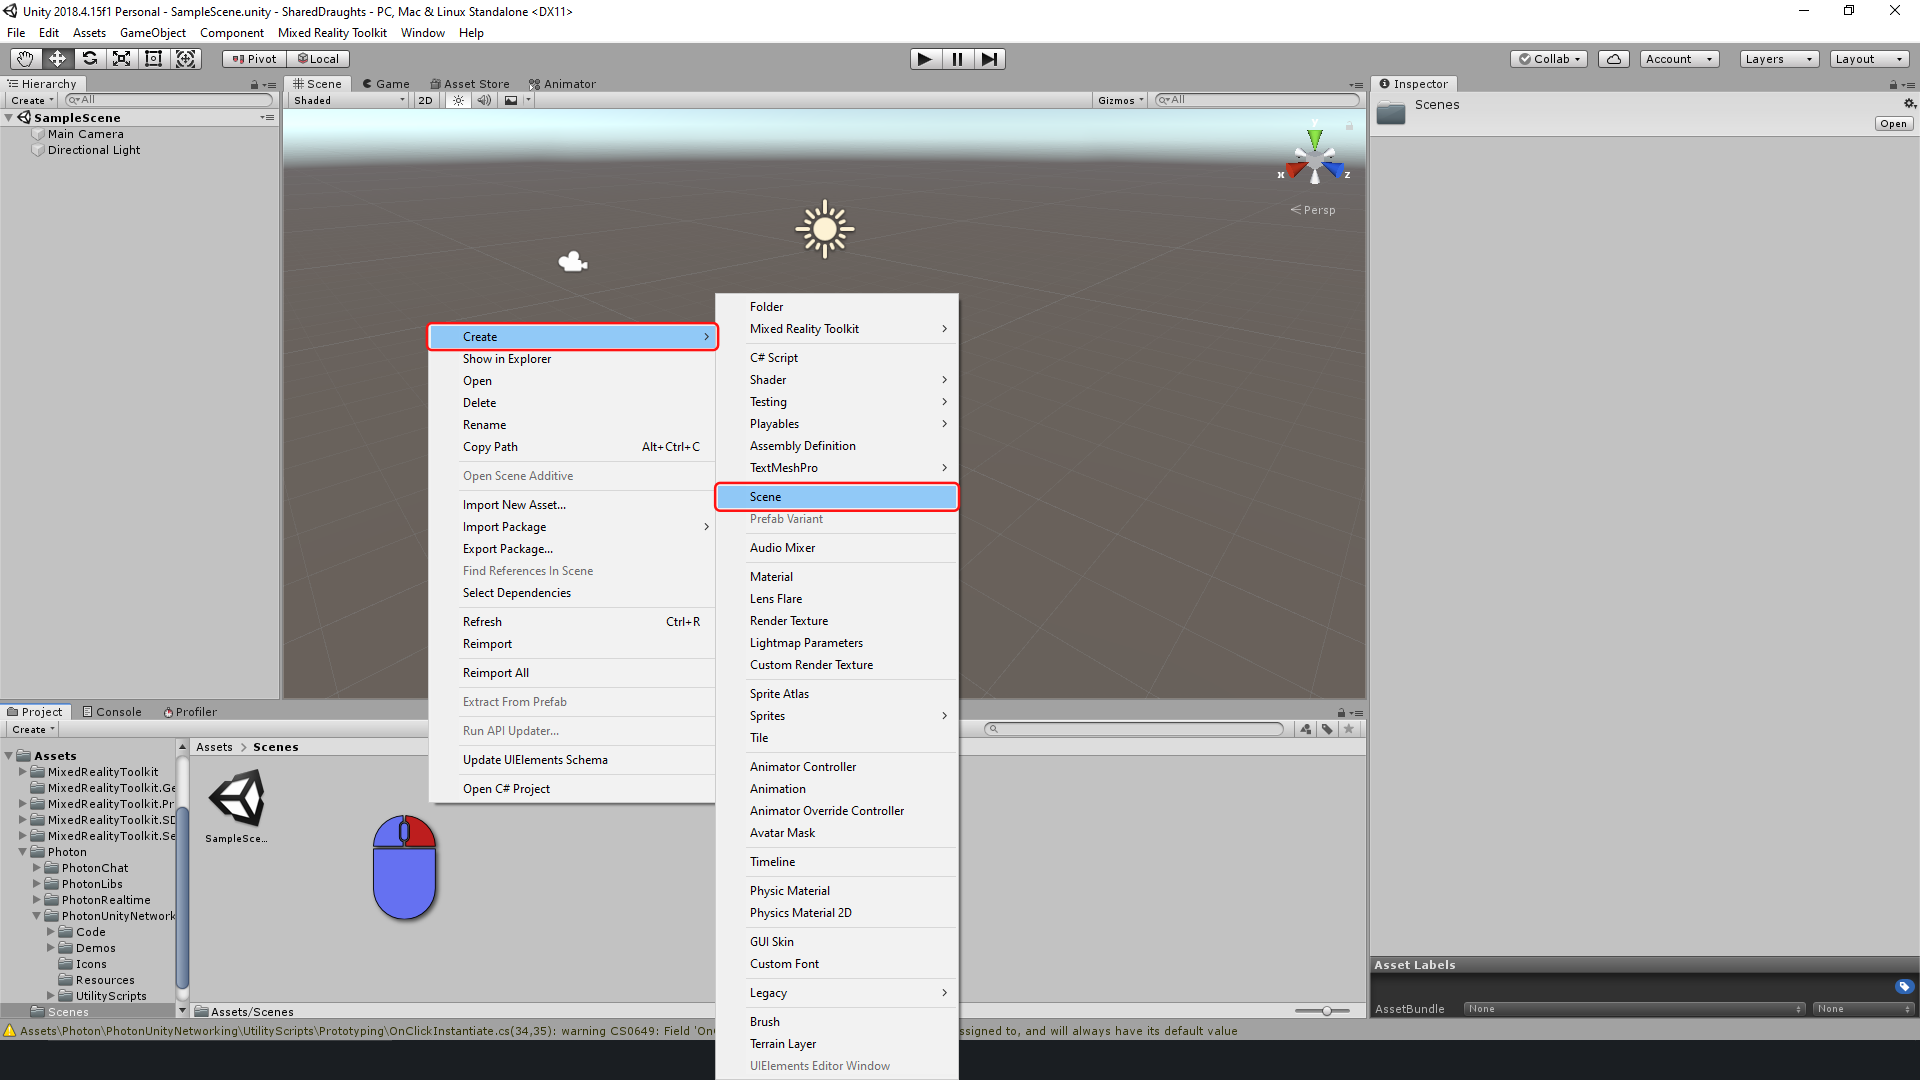
- First, we need to create the scene. To keep things organized, go to the “Scenes” folder in the assets browser, perform a right-click and choose Create > Scene. Name the scene “MainScene”.
Perform a double click on the scene file in the assets browser to open it in the 3D view. You can confirm that the scene was opened by looking at the title bar of the Unity window. It includes the name of the open scene.
2.In the top menu select Mixed Reality Toolkit > Add to Scene and Configure

This adds a MixedRealityToolkit GameObject and a MixedRealityPlayspace GameObject to the scene’s hierarchy.
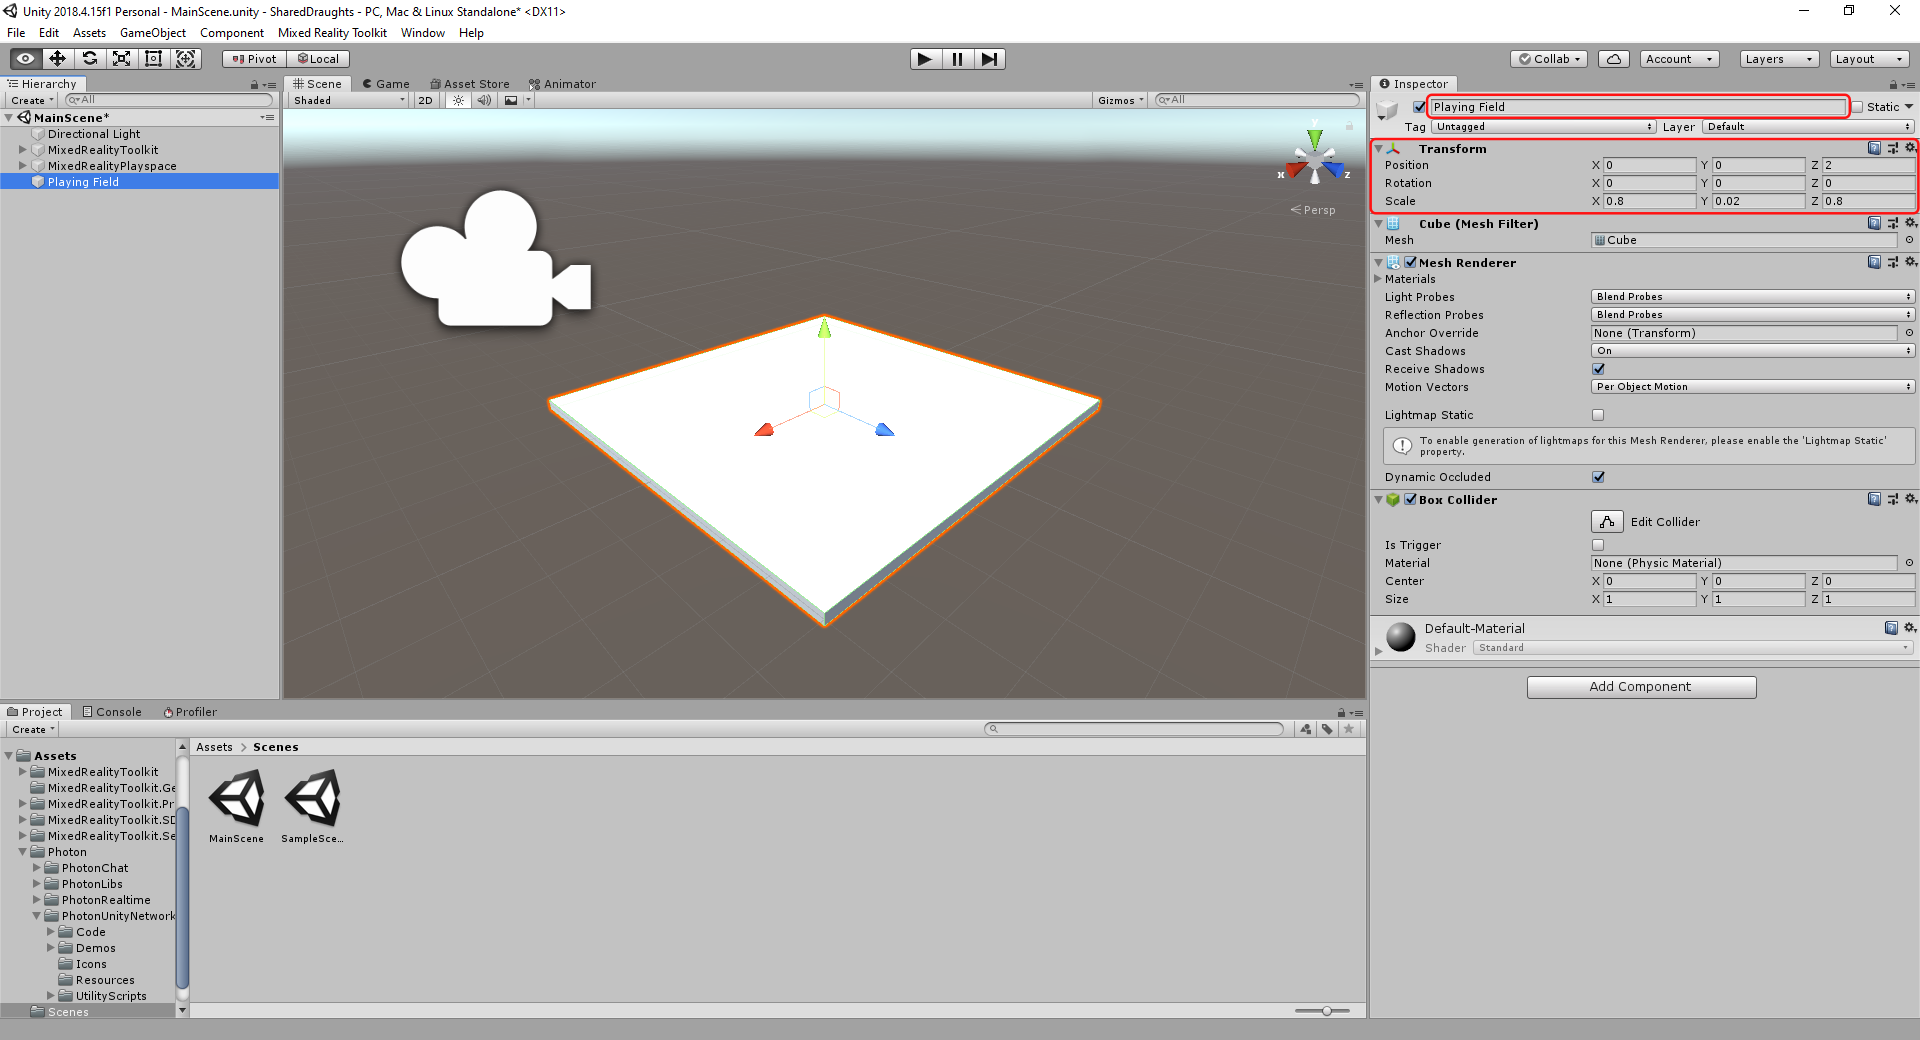
3.Add a cube to the scene by choosing GameObject > 3D Object > Cube from the top menu. It will act as the playing field. Rename it in the inspector to “Playing Field”. There, you can also move the cube to the position (0, 0, 2) so that it is two meter in front of the user at the application start. Scale it to the measurements (0.8, 0.02, 0.8) so that it is a flat playing field.
4.We will now import the checkerboard texture for the playing field. To keep your project organized, create a new folder with the name “Textures” in the root assets folder. You can do this by performing a right-click in Unity’s asset browser and choosing Create > Folder. Download the given checkerboard texture by right-clicking on this link and choosing Save target as…. Place the texture in the new folder. Simply navigate in the file browser dialogue to the place where you saved your Unity project. It contains the asset folder and within it the textures folder. If you return to Unity, the texture will show up in the asset browser.
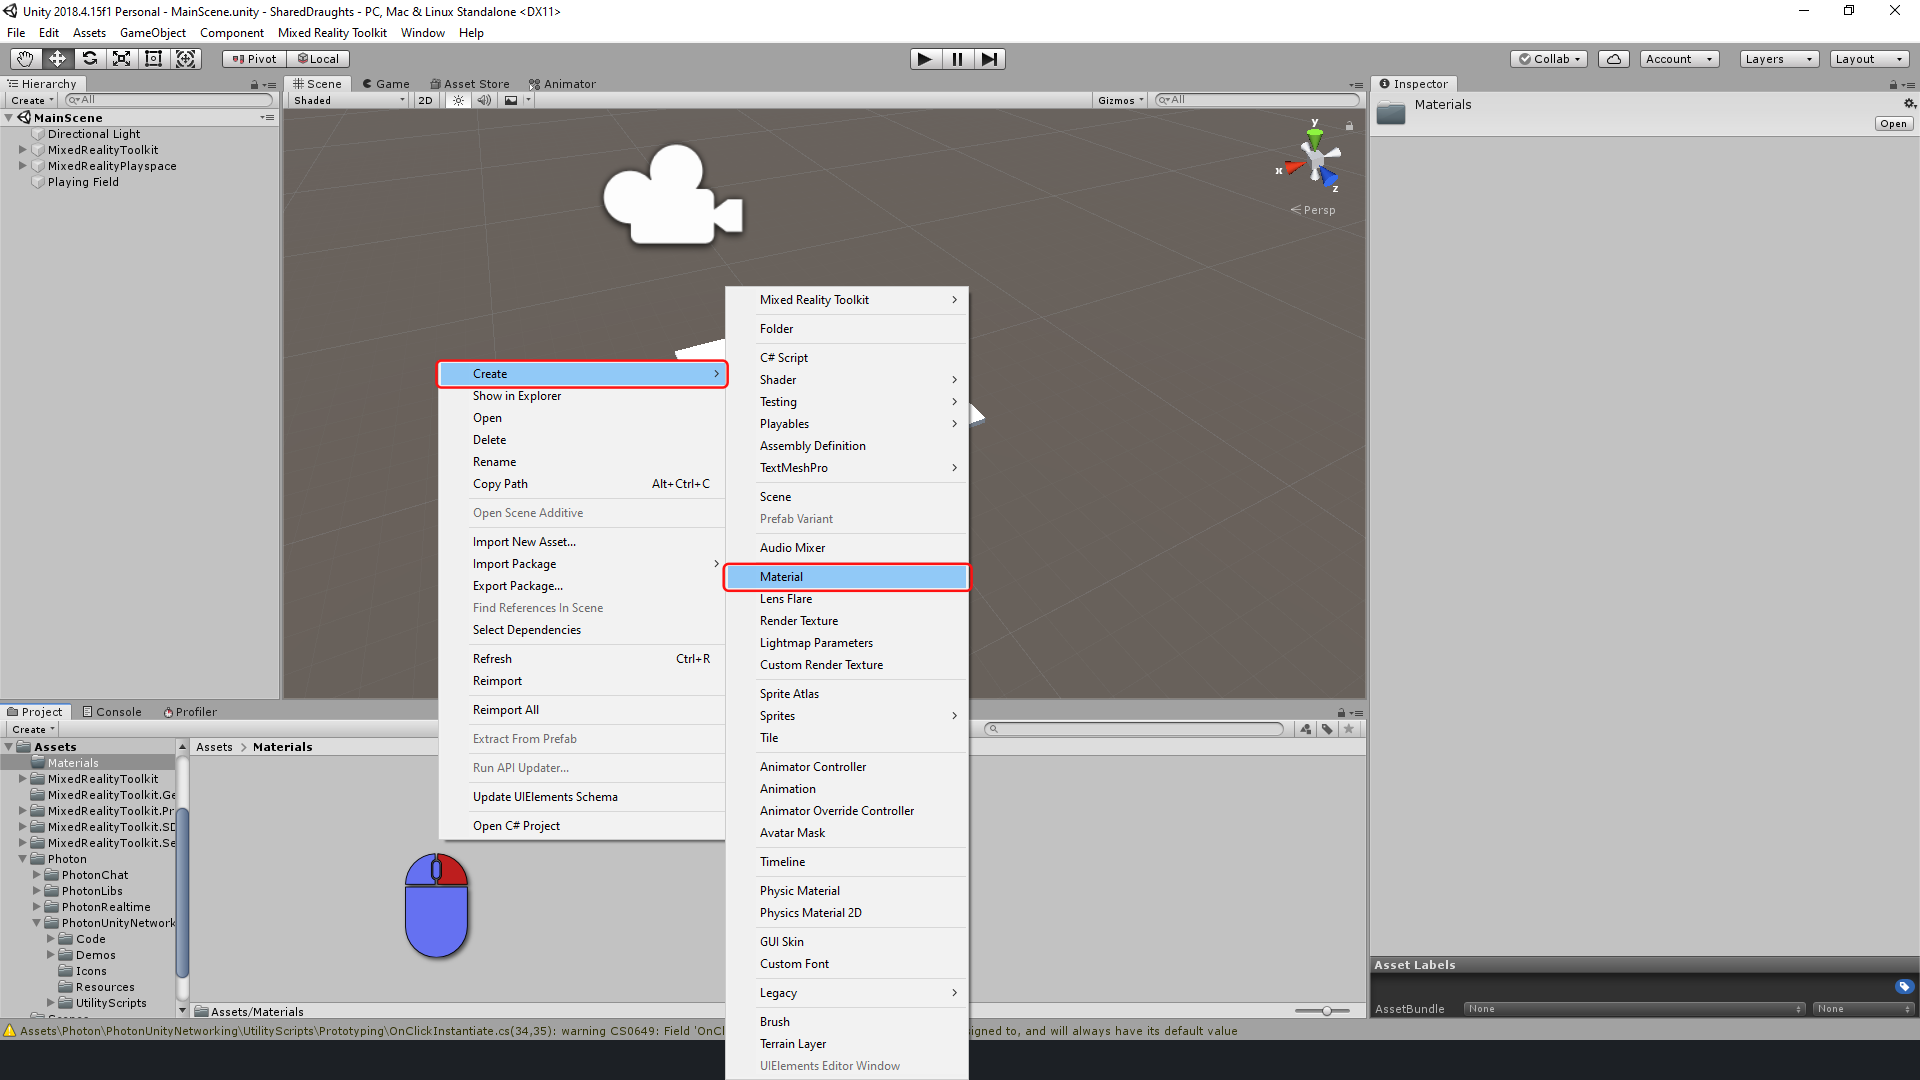
5.Next, we create a new material. Go to the assets folder in Unity and create a folder “Materials” (right-click, Create > Folder). With the folder opened in Unity’s asset browser, right-click and select Create > Material to create a new material. Enter the name “Checkerboard” and confirm with enter.
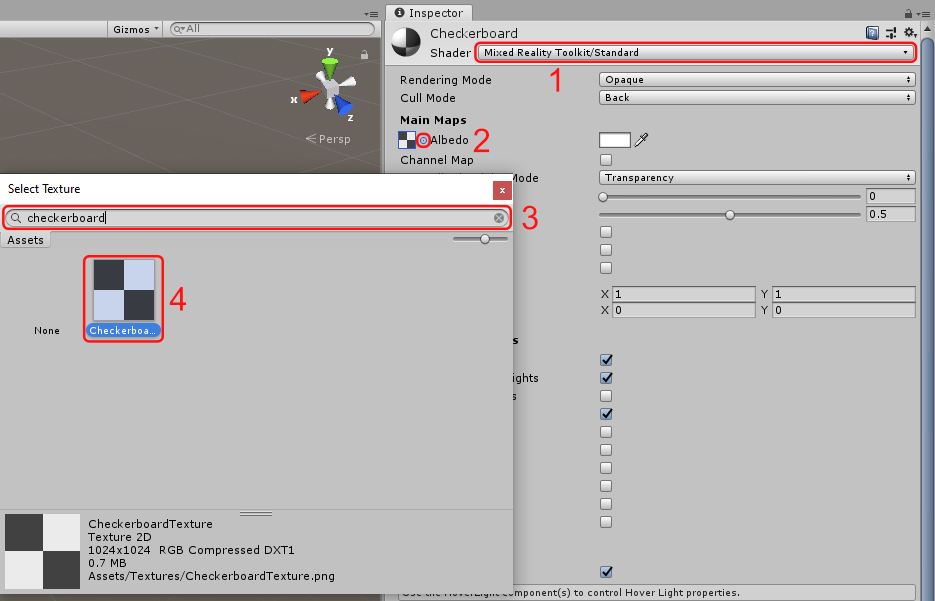
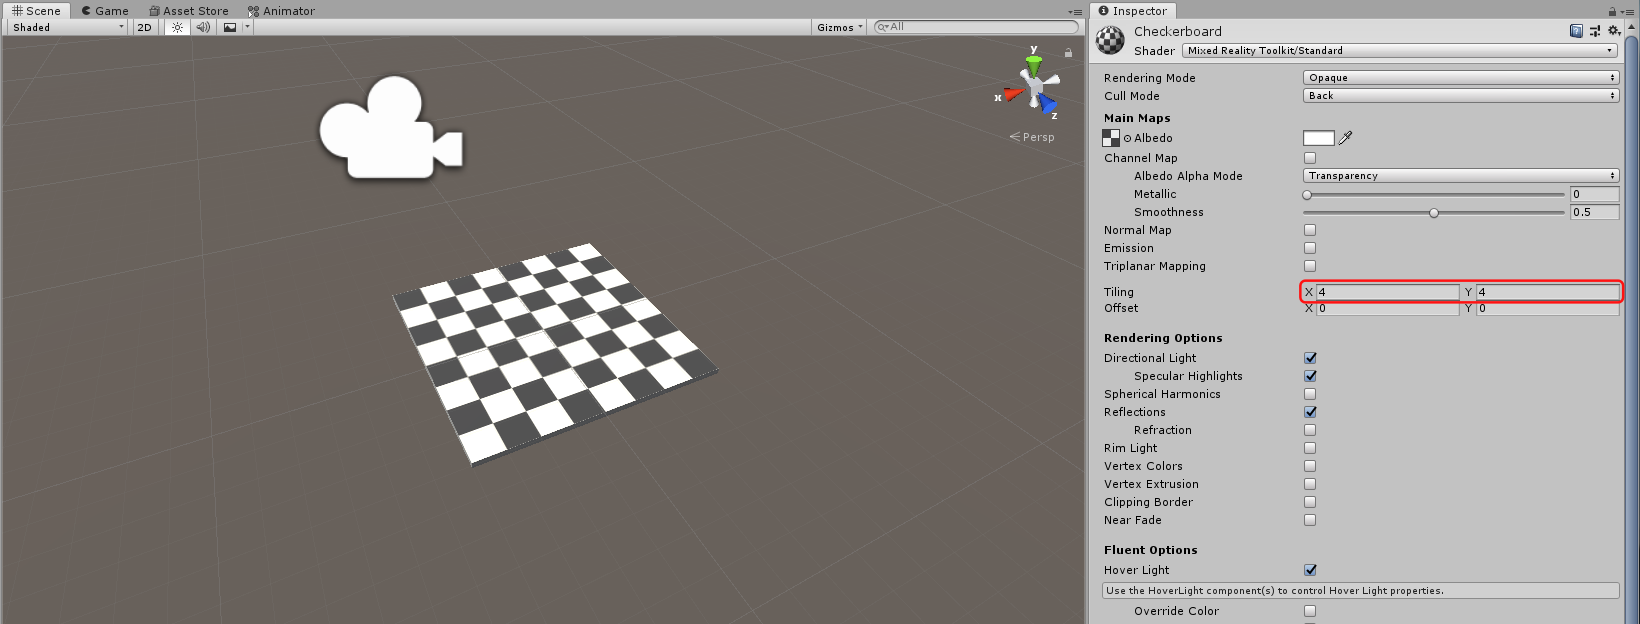
6.Select the material in the asset browser so that it can be configured in the inspector. First, we will change the material’s shader to the optimized shader of the Mixed Reality Toolkit. Click on the Shader dropdown at the top of the inspector and change it to Mixed Reality Toolkit > Standard. Next, we will assign the texture to the material. There is an “Albedo” property underneath Main Maps. Click on the icon with the small circle with a dot in the middle left of the “Albedo” text to choose a texture. A dialogue with all textures in the project opens. Search for “Checkerboard” (the name of the texture) and select it. After that you can close the dialogue window again.
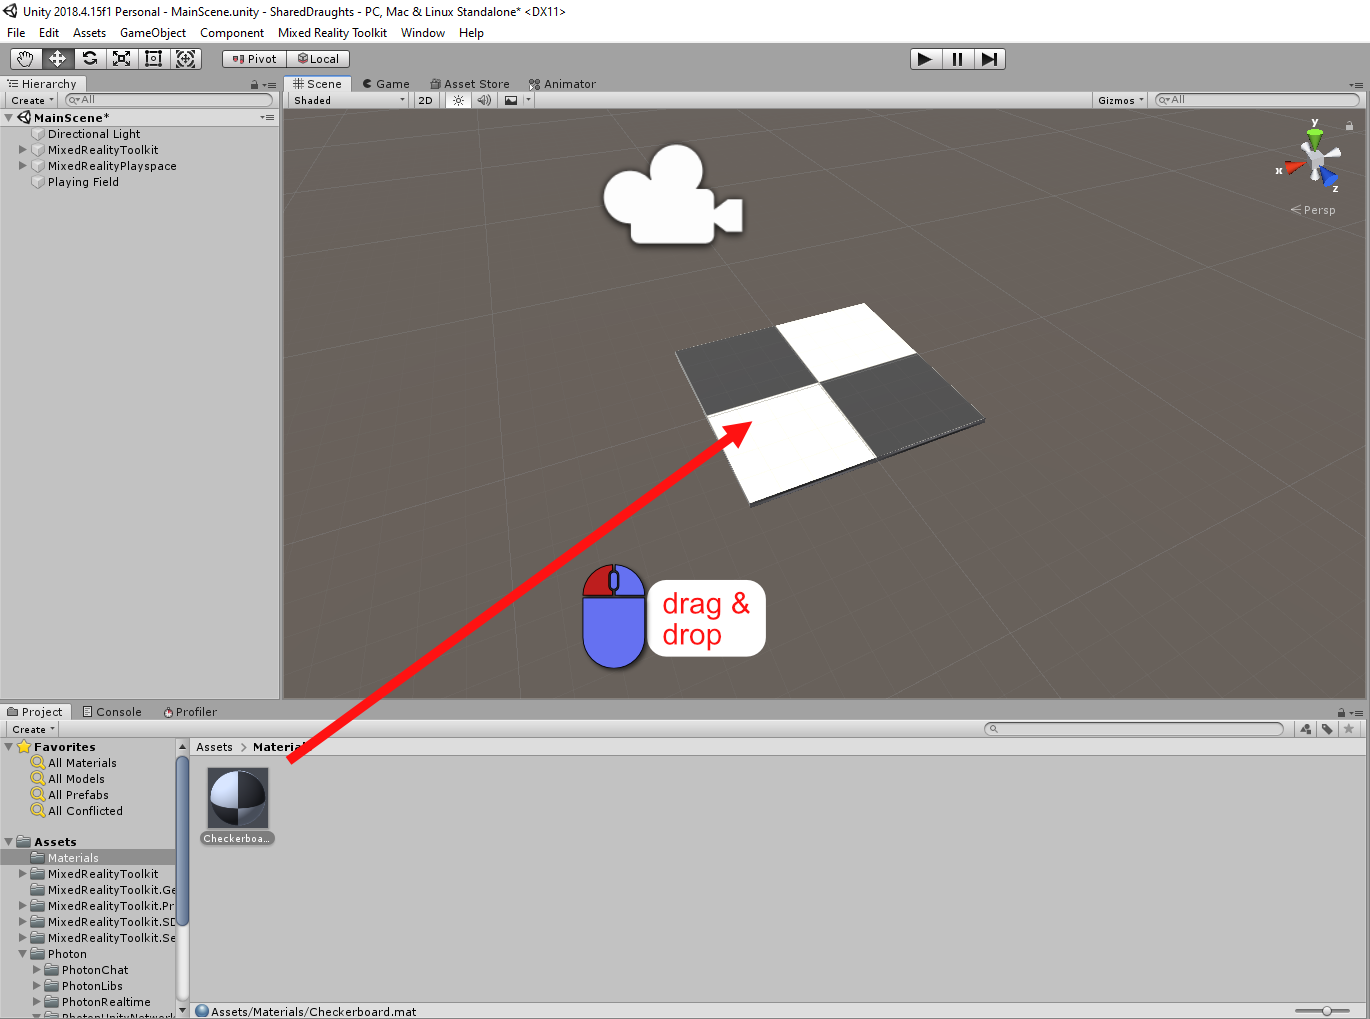
7.Apply the material to the playing field object by dragging and dropping it from the asset browser onto the GameObject.
8.Draughts is played on a chess board which has 8 by 8 fields. At the moment we only have a 2 by 2 board. We can change this by increasing the texture’s tiling factor in the material’s settings to 4 for X and Y.
9.We now have a board, but we still need the game pieces. There are two kinds of game pieces in Draughts: A man and a king. A king is represented by two stacked pieces. To support both kinds of game elements in the application, we will create one general purpose GameObject where two cylinders are stacked on top of each other. If we want to represent a man, we disable the cylinder on the top; for kings the upper cylinder will be enabled. We need a parent GameObject which will hold both cylinders. Add an empty GameObject in the top menu using GameObject > Create Empty. Name the GameObject “GamePiece” in the inspector.
10.Create a cylinder (GameObject > 3D Object > Cylinder).
Scale the cylinder to (0.08, 0.01, 0.08) so that it fits onto one field of the board.
Make the cylinder a child of the GamePiece.
This can be done by dragging and dropping the entry of the cylinder onto the entry of the GamePiece in the hierarchy view.
Move the cylinder to the position (0, 0.01, 0) so that the origin of the GamePiece object is at the bottom of the cylinder.
11.By default, the cylinder has a capsule collider which approximates its shape well with the exception of the caps at the top which are rounded.
However, the capsule collider cannot approximate the flat shape of the piece.
Therefore, remove the capsule collider in the inspector.
This is possible by clicking on the small cogwheel right of the Capsule Collider section and by selecting Remove Component from the opened context menu.

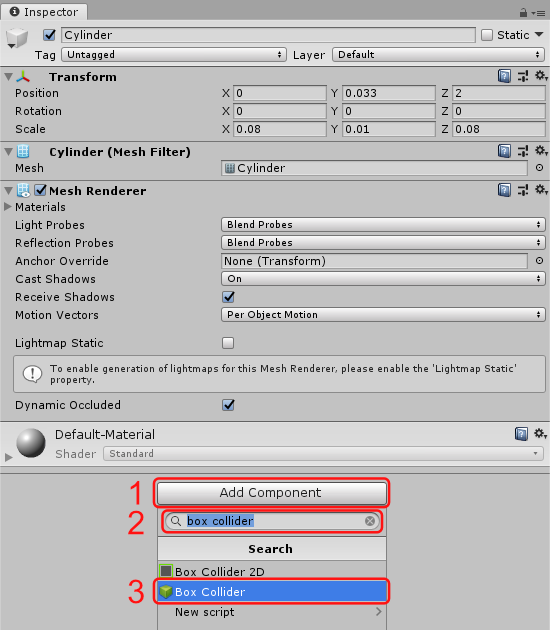
After that, add a box collider by clicking the *Add Component* button at the bottom.
In the open menu search for "Box Collider" and choose the `Box Collider` component.
The added box collider automatically fits around the cylinder.
12.Duplicate the cylinder by selecting it and using the keyboard shortcut Ctrl + D and move the new copy to the position (0, 0.033, 0) so that it sits on top of the other cylinder with a little gap between the two pieces.
13.Create a new material in the “Materials” folder and name it “GamePiece”. Change its shader to the Mixed Reality Toolkit > Standard shader. Apply the material to both cylinder objects by dragging and dropping it onto them.
14.Add a PhotonView component to the GamePiece GameObject.
This component will later make sure that playing piece can be synchronized.
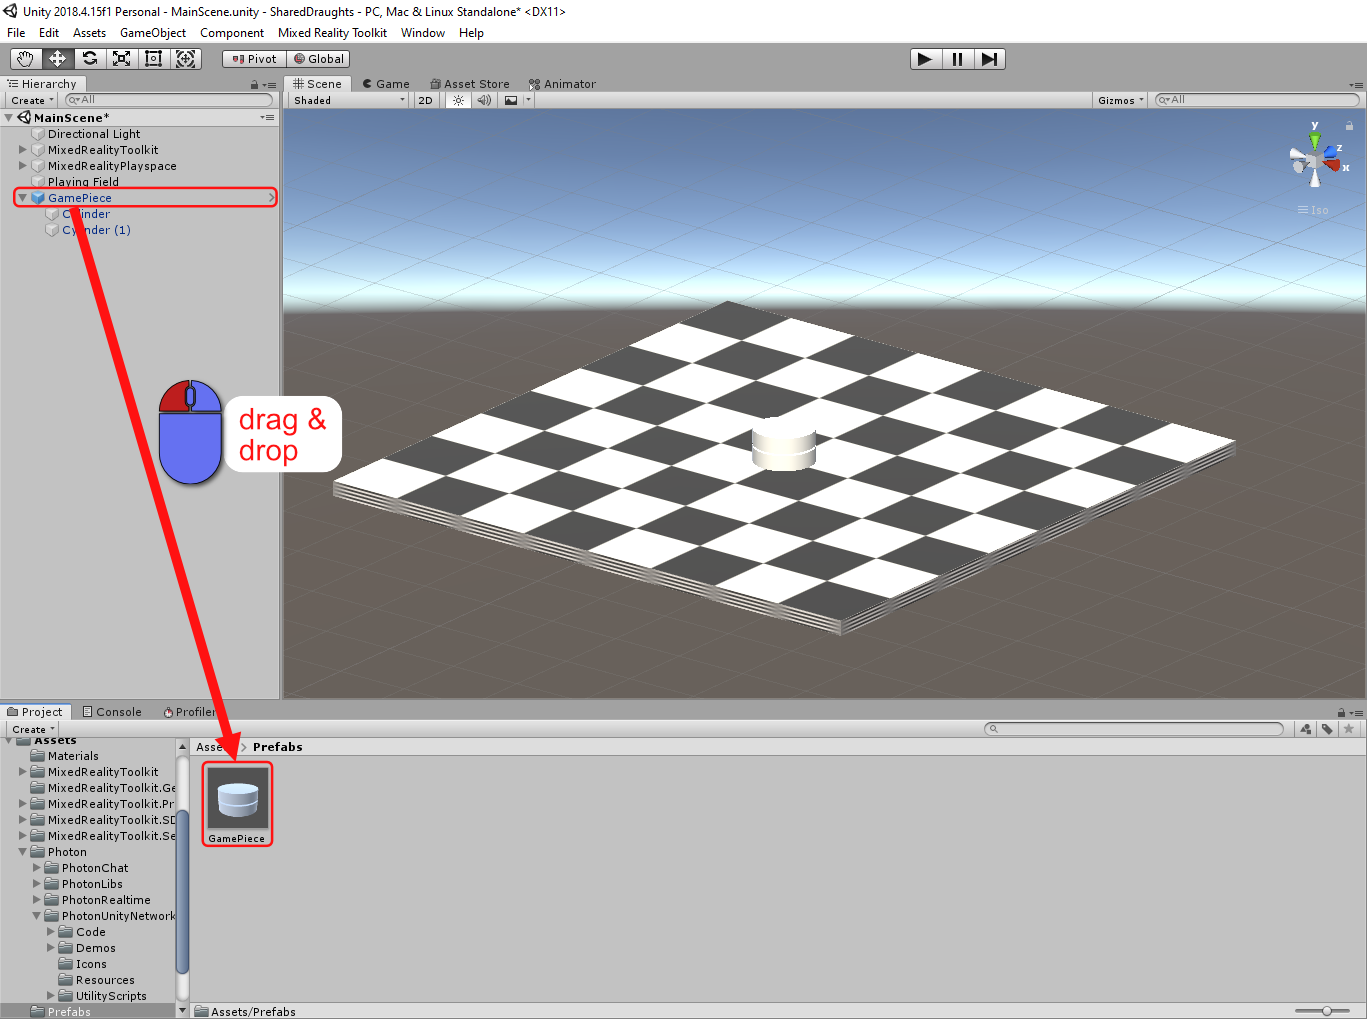
15.Create a Prefab from the stacked pieces.
To do this, create a new folder in the assets folder called “Prefabs”.
We want to create instances of the prefab later using the sharing library.
Therefore, we need another folder inside the “Prefab” folder which must be called “Resources”.
The name of this folder is important since scripts can access the content folders with this name.
With the folder open in assets browser, drag and drop the GamePiece object from the hierarchy into the assets browser.
This should create a new file called “GamePiece” with a thumbnail that looks like the game piece that we just created.
16.The prefab is saved on the hard drive and you can delete the GamePiece GameObject in the scene.
Select it and press the delete key on the keyboard.
3 - Setting up the Shared Environment
The application will work with two scenes. The player will start in a start scene which is for connecting to the shared environment. Once a connection has been established, the player switches to the main scene which contains all the objects.
-
Create a new scene called “StartScene”. We will use this scene to implement the connection logic to connect to the sharing servers. Double-click on the scene file to open it in the 3D view. You can now add the Mixed Reality Toolkit to this scene. In the top menu select “Mixed Reality Toolkit > Add to Scene and Configure…”.
-
Open the scene and create a new empty GameObject. Name it “RoomLauncher”. This GameObject will hold a script which initiates the connection try to the servers.
-
Create a new script and call it “RoomLauncher”. To create the script, perform a right-click in the assets browser and select Create > C# Script.
-
Open the script and implement the following piece of code:
using Photon.Pun;
using UnityEngine;

public class RoomLauncher : MonoBehaviourPunCallbacks
{
    private string gameVersion = "1";

    private void Awake()
    {
        PhotonNetwork.AutomaticallySyncScene = true;
    }

    private void Start()
    {
        ConnectToServer();
    }

    private void ConnectToServer()
    {
        if (PhotonNetwork.IsConnected)
        {
            PhotonNetwork.JoinRandomRoom();
        }
        else
        {
            PhotonNetwork.ConnectUsingSettings();
            PhotonNetwork.GameVersion = gameVersion;
        }
    }

    public override void OnConnectedToMaster()
    {
        Debug.Log("OnConnectedToMaster");
        PhotonNetwork.JoinRandomRoom();
    }

    public override void OnJoinRandomFailed(short returnCode, string message)
    {
        Debug.Log("OnJoinRandomFailed. Creating new room");
        PhotonNetwork.CreateRoom("", new Photon.Realtime.RoomOptions{ MaxPlayers = 2 });
    }

    public override void OnJoinedRoom()
    {
        Debug.Log("Joined a room");
    }
}
Let us go over the code to see what happens. First of all, the script should inherit from
MonoBehaviourPunCallbacks. This class is a MonoBehaviour which contains callback methods of the sharing library PUN. The base class automatically registers the script so that the callback methods are invoked in the right moments. In our script, we can override these methods in the base class. It is not necessary to call the base methods since they are empty. After GameObject has been initialized inStart(), we immediately try to connect to the server. There are two connection stages. If we are disconnected, we first need to connect to the server and are automatically placed in a lobby. In this lobby we can join rooms which separate parallel sessions. When connecting to the server, we can pass settings such as the game version. If we continue developing the application, we can increment the game version once we introduce breaking changes. Clients which use different game version strings will not be able to connect to each other to avoid incompatible sharing data. Once the connection to the server has been established,OnConnectedToMaster()is called. In this example, we implement a random pairing of participants. The methodPhotonNetwork.JoinRandomRoom()will connect to a random existing room. The connection methods have a positive and a negative callback method. For instance, there is aOnJoinedRoom()method that notifies us that the client is now in a room. However, theJoinRandomRoom()method can also fail if no room exists or all rooms are full. In this case, the negative callbackOnJoinRandomFailedis called, and we can create a new room. A new room is created using the methodPhotonNetwork.CreateRoom(...). The first argument is the room’s name. Since we left this empty, the server will just generate a random name. In the second argument, we can pass settings for the room. Since Draughts is a two-player game, we allow a maximum of two players to join a room. -
Add the script as a component to the GameObject
RoomLauncher. -
Next, we will set up the scene switching. Note that for the sake of simplicity, we will use Unity’s API to switch between scenes. However, the MRTK also provides a scene management system which makes sure that the MRTK is consistent across scenes. Since we will not change the configuration of the MRTK in this tutorial, it is fine to stick with Unity’s API. Go to File > Build Settings and open the Build Settings Window. While keep the window open, navigate to your scenes folder in the assets browser. First, drag-and-drop the StartScene into the list Scenes in Build at the top of the Build Window. After that, also drag-and-drop the MainScene. In the list, StartScene should now have a 0 next to it on the right and MainScene a 1. The number is the scene index which can be used to address the scene.
 Note
Note
Make sure that you always start the application with the StartScene opened so that the connection procedure is executed. If you start in the MainScene, the client will stay disconnected which leads to error messages as the application tries to synchronize data but cannot reach the server.
- Go back to the
RoomLauncherscript. In theOnJoinedRoom()method, add the lineSceneManager.LoadScene(1);. This only works if you add the directiveusing UnityEngine.SceneManagementat the top. Once the client has joined a room, the scene will switch. You should now be able to start the application in the StartScene. In the console, you can keep track of the connection process and after a couple of seconds, the scene should switch to MainScene where the board is set up.
4 - Implementing the Game Pieces Setup
Right now, players can enter a room and will find an empty board. In the next few steps, we will change this so that the application automatically initializes the play pieces and assigns them a colour.
- Create a script
BoardInitializerand attach it thePlaying FieldGameObject. It will initialize the board by placing the own pieces on the playing field. -
Copy and paste the following code to the
BoardInitializerscript.using Photon.Pun; using System.Collections; using System.Collections.Generic; using UnityEngine; public class BoardInitializer : MonoBehaviour { public const string firstPlayerFlag = "FirstPlayer"; public Transform mixedRealityPlayspace; private void Start() { bool firstPlayer = true; // check if we are the first or second player in the room // each player has a shared flag which is realized as a custom property for (int i = 0; i < PhotonNetwork.PlayerListOthers.Length; i++) { if ((bool)PhotonNetwork.PlayerListOthers[i].CustomProperties[firstPlayerFlag]) { Debug.Log(PhotonNetwork.PlayerListOthers[i].ActorNumber + " is first player"); firstPlayer = false; break; } } // set the flag for this player // we cannot just add the property to the player but need to re-assign the entire hashtable to distribute the changes ExitGames.Client.Photon.Hashtable playerProperties = new ExitGames.Client.Photon.Hashtable(); playerProperties.Add(firstPlayerFlag, firstPlayer); PhotonNetwork.LocalPlayer.SetCustomProperties(playerProperties); float cellSize = 1 / 8f; // determine which side the player should be on float playerDirection; if (firstPlayer) { playerDirection = 1; } else { playerDirection = -1; } // place the playing pieces Vector3 leftBottomStartPosition = new Vector3(playerDirection * -0.5f, 0.5f, playerDirection * -0.5f); for (int row = 0; row < 3; row++) { for (int column = row % 2; column < 8; column+=2) { // create a networked insteance of the gamepiece // set the position and rotation to default values since we will first parent the object to the board // and then change the position relative to the board GameObject gamePiece = PhotonNetwork.Instantiate("GamePiece", Vector3.zero, Quaternion.identity, 0); // parent the piece to the board gamePiece.transform.parent = transform; Vector3 localPiecePosition = new Vector3( playerDirection * (cellSize * column + cellSize / 2f), 0, playerDirection * (cellSize * row + cellSize / 2f) ); gamePiece.transform.localPosition = leftBottomStartPosition + localPiecePosition; } } // the second player starts on the opposite side of the board if (!firstPlayer) { mixedRealityPlayspace.position = new Vector3(0, 0, 4); mixedRealityPlayspace.eulerAngles = new Vector3(0, 180, 0); } } }The
Start()method is executed when the player enters the scene. Initially, we determine on which side of the board the player will start. This is done by checking the custom properties of the players. Only the first player will have a custom property “FirstPlayer” which is set totrue. This property is set for all players when they enter the scene because we assign the custom property in this script. Custom properties are automatically synced between participants. This method is stable so that players can leave and join during a match. No matter who joins and leaves, new players will always be placed on the empty side of the board. The second part of the setup procedure places the playing stones on the board. We usePhotonNetwork.Instantiateinstead ofGameObject.Instantiateso that the object is shared between participants. The position is set relative to the playing board. Finally, we place the camera on the opposite end of the board if this is the second player. - We still need to establish the reference to the public variable MixedReality Playspace.
Select the
PlayingFieldGameObject. Next, drag-and-drop the GameObject entry of the MixedReality Playspace from the hierarchy into the inspector and onto the Mixed Realiy Playspace field. - The next step is to add the interaction so that the user can move the object.
Open the “GamePiece” prefab again and add a component
Object Manipulator. This component is from the Mixed Reality Toolkit and allows users to drag objects through the scene. - The playing pieces should rest on the board.
However, if we give users free movement options, the stones can also be placed in mid-air.
Hence, we can add a constraint to the
Object Manipulator. In the inspector, the component has a section “Constraints”. Click the dropdown menu below it and select MoveAxisContraint. This will add aMove Axis Constraintcomponent below theObjectManipulatorcomponent in the inspector. In theMove Axis Constraint, set the Constraint on Movement to Y Axis. This disallows up and down movement of the pieces so that they will always stay flat on the playing board. -
Now, we can implement the upgrade functionality which toggles between a man, symbolized by one play stone, and a king who consists of two stacked stones. We have already set up the prefab with two pieces on top of each other, so all we have to do in the script is to deactivate the top piece. Create a script
PieceStateManagerwhich will take care of this. Implement the following code in this script:using Microsoft.MixedReality.Toolkit.UI; using System.Collections; using System.Collections.Generic; using UnityEngine; public class PieceStateManager : MonoBehaviour { public GameObject topStone; public bool IsKing { get => topStone.activeSelf; private set => topStone.SetActive(value); } public void SetIsKingLocal(bool value) { IsKing = value; // TODO: add network broadcast to notify clients } public void SetIsKingRemote(bool value) { IsKing = value; } private void Start() { SetIsKingLocal(false); } public void ToggleState() { SetIsKingLocal(!IsKing); } }This script establishes the semantic connection between the top stone in the stack and a king. Instead of making the setter public, add two set-methods
SetIsKingLocalandSetIsKingRemote. We will need them later to distinguish where a value change has originated. If it is a local change, i.e. the user has upgraded one of their stones, we will need to broadcast this information to all other clients. Remote changes, i.e. received changes will need to use theSetIsKingRemotemethod which just changes the value but does not trigger another broadcast of values. Otherwise, we would get a never-ending cascade of network messages. Also add a methodToggleStatewhich is used to switch the current state. We will call this method if the user triggers the corresponding action on the play piece. We will later return to this script to implement the networking features. PieceStateManageronly gives us the connection between the piece logic and the visual representation. We still need to give the user a way to switch between the man and king representation. To do this, the user will be able to tap on the playing stone and it will toggle between man and king. So, implement a new scriptClickRecognizerwhich will allow us to recognize taps on the object. Add the script to the “GamePiece” prefab.-
Implement the following code in the script:
using Microsoft.MixedReality.Toolkit.Input;
using UnityEngine;

public class ClickRecognizer : MonoBehaviour, IMixedRealityPointerHandler
{
    PieceStateManager stateManager;

    private float startTime;

    private void Start()
    {
        stateManager = GetComponent<PieceStateManager>();
    }

    public void OnPointerClicked(MixedRealityPointerEventData eventData)
    {
        float endTime = Time.time;
        if (endTime - startTime < 0.4f)
        {
            stateManager.ToggleState();
        }
    }

    public void OnPointerDown(MixedRealityPointerEventData eventData)
    {
        startTime = Time.time;
    }

    public void OnPointerDragged(MixedRealityPointerEventData eventData)
    {
    }

    public void OnPointerUp(MixedRealityPointerEventData eventData)
    {
    }
}
We can use the
IMixedRealityPointerHandlerto react to tap input. Usually, we could just implement our logic inOnPointerClickedbut in this case, we have a conflict with theObjectManipulatorcomponent. Manipulation gestures where the user drags an object across the scene also count as pointer events which raise theOnPointerClickedmethod. Therefore, add a time check where the timestamp at the beginning of the pointer action is recorded and compared to the time at the end of the pointer action. Only if the entire gesture happens within 400ms, it is recognized as a tap. - As a last tweak in the setup routine, we initialize the playing pieces.
We need to set the colour of the playing piece based on its owner.
We do not actually need to synchronize the colour itself because we can simply reconstruct it from data that we already get.
If a networked object is created in a scene, the player who created the object automatically becomes its owner.
The owner can be read from the
PhotonViewcomponent. So, make sure that there is aPhotonViewcomponent on the “GamePiece” prefab. Create a new scriptPieceInitializerand attach it to the “GamePiece” prefab. -
Paste the following code into the
PieceInitializerscript:using Microsoft.MixedReality.Toolkit.Experimental.UI; using Photon.Pun; using UnityEngine; public class PieceInitializer : MonoBehaviourPun { private void Start() { bool isFirstPlayer = (bool)photonView.Owner.CustomProperties[BoardInitializer.firstPlayerFlag]; Renderer[] renderers = GetComponentsInChildren<Renderer>(true); for (int i=0;i<renderers.Length;i++) { if (isFirstPlayer) { renderers[i].material.color = new Color(0.9f, 0.9f, 0.9f); } else { renderers[i].material.color = new Color(0.1f, 0.1f, 0.1f); } } if (!photonView.IsMine) { GetComponent<ObjectManipulator>().enabled = false; GetComponent<ClickRecognizer>().enabled = false; } } }The script inherits from
MonoBehaviourPun. This class inherits fromMonoBehaviourbut also fetches a reference to aPhotonViewcomponent. The script reads the owner usingphotonView.Owner. Just like the board setup, it checks who the first player is by querying the custom properties of that player. After that, it fetches all renderers, i.e. the renderers of the two cylinders which make up the playing stone. It sets the colour on the render’s material, either to a light or a dark tone. Additionally, the initialization of the pieces can be used to disallow users to move pieces which are not their own. By checkingphotonView.isMine, we can find out if a GameObject is owned by the local player on this client. If it is not owned by the local player, we deactivate the two scripts which provide user interaction. This way, a playing stone can only be moved or upgraded by the player who owns it.
5 - Synchronizing Data with Observables
At this point, the players can find a random room, enter the room and are presented with a playing field where their own side is correctly set up with playing pieces. The playing pieces can be moved, and they can be upgraded to kings. However, the movement and the state of the playing piece are not yet synchronized. In this section, we will tackle the movement synchronization in two alternative ways using observable components. Photon provides pre-made components which synchronize common properties like the position, rotation and scale. They can simply be added to a GameObject and work. The second alternative will demonstrate how to synchronize these data using a custom observable.
- In Unity’s assets browser, navigate to the prefabs folder and open the GamePiece prefab by double-clicking on it.
- The central component which is necessary to synchronize GameObjects with Photon is the
Photon View. Select the root GameObject of the prefab and in the inspector, add thePhoton Viewcomponent. It acts as an observer which is able to monitor other components on the GameObjects and can broadcast their changes over the network. -
This step is divided into two alternative components that can be monitored by the
Photon View. The pre-defined Photon Transform View does not require any programming but only gives the standard options per GameObjects. Own observables give more flexibility but require implementation work. After the steps for one of the alternatives, continue with step 4.Alternative 1: Pre-defined Photon Transform View
- Select the root GameObject and add a component
Photon Transform Viewin the inspector. It can be used to synchronize the position, rotation and scale of a GameObject. - The play stones cannot be rotated or scaled by the player. Hence, it is sufficient to only check position and to uncheck rotation and scale.
Alternative 2: Implementing your own Observable
- Create a new script PositionSyncronizer.
- The script should inherit from MonoBehaviour and it should implement the
IPunObservableinterface from thePhoton.Punnamespace. -
Implement the interface’s method
OnPhotonSerializeView(Stream stream, PhotonMessageInfo info). The method is called regularly, and we can write data to the given stream. Thus, the method is responsible for sending and receiving. To decide if we need to write to the stream or read from it, the given stream argument provides a propertyisWriting. One can write to the stream using theSendNext(...)method and objects can be retrieved using theReceiveNext()method. If multiple values are serialized, the order in which they are written and read needs to be the same. This leads to the following piece of code to synchronize the position:public class PositionSynchronizer : MonoBehaviour, IPunObservable { public void OnPhotonSerializeView(PhotonStream stream, PhotonMessageInfo info) { if (stream.IsWriting) { stream.SendNext(transform.position); } else { transform.position = (Vector3)stream.ReceiveNext(); } } } - If you move the object on one client and watch the object on another, you will notice that the remote participant will see the movement but it is not a smooth movement. This is due to the fact that the position is only sent ten times per second which is not enough to create a smooth movement. A possible fix is to smoothly interpolate towards the position (also see “Common Challenges of Networking” at the top). However, the movement smoothing is beyond the scope of this tutorial. There are sophisticated ways to smooth the movement which avoid a “rubber-banding” effect, e.g. by also synchronizing the object’s velocity vector to predict where the object will move.
- Select the root GameObject and add a component
- The Photon View component has a list Observed Components at the bottom.
You can add components which implement the
IPunObservableinterface. The Photon View will repetitively call the serialization methods and observe the serialized values. Drag-and-drop either the pre-defined Photon Transform View or the own implemented observable into this list.
6 - Synchronizing Data with Remote Procedure Calls
At this point, we can move the play stones around on the board and we can see if the opponent moves his or her playing stones. However, one last sharing feature is missing: If you tap on a play stone, it will switch between a man and a king locally but the other participants are unable to see this change. As with any value, there are multiple ways to synchronize the data. We have already seen observables which are suitable for synchronizing values which change often. We could also synchronize the current status of the play piece using observables. However, the change from man to king only happens occasionally, so there is no need to create an observable that is serialized multiple times per second. Instead, we will use Remote Procedure Calls (RPCs) to broadcast the change.
- Create a new script
PieceStateSynchronizerand attach it to the root object of the “PlayPiece” prefab. - Like observables, RPCs require a PhotonView component.
Make sure that there is a
PhotonViewobject on the same GameObject. -
In the script, change the base class from
MonoBehaviourtoMonoBehaviourPun. This requires the using-directiveusing Photon.Pun. This way, the script already contains a reference to thePhotonViewcomponent and we do not need to fetch it ourselves. - Create a method
void BroadcastStoneState(). We will call this method if the stone changes between man and king. -
Add the following method body to the
BroadcastStoneState()method:public void BroadcastStoneState() { if (pieceStateManager == null) { pieceStateManager = GetComponent<PieceStateManager>(); } photonView.RPC("ReceiveStoneState", RpcTarget.Others, pieceStateManager.IsKing); }First, we get a reference to the
PieceStateManagercomponent, if we have not cached it already. This way, we can access the current state and can tell if the stone is a man or a king. The last line invokes an RPC with the name “ReceiveStoneState” and sends it to all other connected clients. As an argument, it passes in the status of the stone which we defined in theStoneStateManager. -
We now need to create the method
void ReceiveStoneState(...)which is invoked by the RPC. Make sure that the method’s name is exactly the same as the string from the RPC in the previous step. It is important that we tell Photon that this is a method that can be called by remote clients. To achieve this, insert the attribute[PunRPC]in the line above the method definition. The method gets two arguments: The first one isbool isKing. The type corresponds to the type that we passed in when we called the RPC. The second argument isPhotonMessageInfo info. It provides additional information about the RPC call. In the method’s body, setstoneStateManager.IsKingto the given value. Overall, this leads to the following piece of code:[PunRPC] private void ReceiveStoneState(bool isKing, PhotonMessageInfo info) { if (pieceStateManager == null) { pieceStateManager = GetComponent<PieceStateManager>(); } Debug.Log("Received RPC from " + info.Sender.ActorNumber + "; isKing: " + isKing); pieceStateManager.SetIsKingRemote(isKing); }Again, we get a reference to the PieceStateManager if we do not have it already. After that, we can apply the remote changes that we received using its remote setter.
-
The last step is to trigger the broadcast if the piece’s state is changed. We already prepared a “TODO” comment in the
PieceStateManagerin itsSetIsKingLocal(...)method. This set-method is called if a local script changes the piece’s state, e.g. by user interaction. The synchronization is handled by thePieceStateSynchronizercomponent. Hence, we need a reference to it. Create a private variableprivate PieceStateSynchronizer stateSynchronizer;. After that, replace the “TODO” comment line with the following piece of code:if (stateSynchronizer == null) { stateSynchronizer = GetComponent<PieceStateSynchronizer>(); } stateSynchronizer.BroadcastStoneState();This part fetches the reference if it has not yet been cached. After that the broadcast-call that we just created is called to transmit the information to all participants.
This concludes the tutorial. You should now have a board game where remote players are matched up at random. Once they are in a room, they can move their own play stones on a board and can upgrade their pieces. Any of these changes can be seen by the other player.
Some Ideas on How to Proceed
The example project can be extended by a number of advanced steps. They are not covered in this tutorial since they require a lot more implementation work
- Login Button: In the start scene, you can add a login button so that players will only join a room once they are ready. Consequently, the connection procedure would be changed so that the client automatically connects to the server but does not immediately try to enter a room.
- Logout Button: Similarly, the main scene can have a logout button so that players can leave a room again, e.g. to find a new match.
The logout command is
PhotonNetwork.LeaveRoom()which returns the user to the lobby. - Room Management: Photon can provide a list of available rooms.
You can visualize this list in the application and you can join a specific room by passing its name in the
JoinRoommethod. - Owner Transfer: At the moment, the stones have a fixed owner, meaning that they can only be moved by that owner.
In this example this makes sense as you are only allowed to move your own play pieces.
However for other examples, the owner can be changed by switching the owner option in the
PhotonViewcomponent from Fixed to Takeover or Request. In code, the ownership can be transferred, e.g. if a player starts moving the stone. - Avatars: The same way that we synchronized the playing stones, we can also synchronize the position and rotation of the head-mounted display. If we connect this information with some avatar representation, we can visualize remote users in the shared environment.
Testing on one PC
Of course, collaborative applications can be tested on two PCs or devices by running the application on each device. However, the shared application can also be tested directly on one development PC. We need to overcome the problem that a Unity project can only be opened by one editor instance at a time. It is possible to open multiple Unity instances, but they cannot open the same project simultaneously. To solve this, we can duplicate the entire project’s folder to a different location on disk. After that, you can open the duplicated folder in Unity as a separate project. In the Unity Hub this can be done by selecting “Add” and by navigating to the duplicated folder. You should now have two instances of Unity with the original project and a copy of it. The two editors can be placed next to each other on the screen or on separate screens. If both editors are in Play Mode, one can see the shared application states side-by-side. With this approach, you need to make sure that you do not confuse the two project copies. Any changes that you make in one editor need to be duplicated to the copied project manually.
There are several options to duplicate the project and to copy changes between the two versions. You can manually copy the files from one instance to the other. Copying an entire Unity project can take quite long as it contains many small cache files. You can shorten the copy-time by only copying selected files. Initially, you only need to copy the folders “Assets”, “Packages” and “ProjectSettings”. All other folders, e.g. “Library” or “obj” can be reconstructed by Unity.
Alternatively, you can set up a Git repository for the project. Use a .gitignore-file for Unity so that only necessary files are stored. Set up a remote repository, e.g. on GitHub or Gitlab. After that, commit the current status and push it to the remote repository. Clone the remote repository into another folder to obtain the copy. Once you make changes to only of the two copies, commit them and push the changes to the remote repository. In the other project instance, you can pull the changes. This approach using Git has the advantage that you can synchronize the two project instances by a few Git commands. Since Git only uploads and downloads the changes, this process is quicker than the approach where files are manually copied.
If you are using this setup, it is generally advisable to keep the two project instances separated. You should always edit the same project. The other project should just be a read-only copy that is for testing. If you view the projects side-by-side, you should always assign the same side for the development project so that you do not accidentally edit both copies.
Example Application for Sharing: VIAProMa
VIAProMa is an open-source framework for collaborative visual analytics in the field of project management. It provides a shared virtual environment where remote participants can collaborate using the Microsoft HoloLens, HTC Vive, as well as Android smartphones and tablets. As such, it provides more examples and more complex implementations of shared features using the Photon library. For instance, VIAProMa utilizes Photon to realize a room system where users can create their own rooms and they can select existing rooms to join them. Moreover, VIAProMa implements an Owner Manager which is able to transfer the ownership of a virtual object to other users by a series of RPCs. By default, GameObjects only exist in a room as long as the user who created it is in the room. VIAProMa realizes more durable GameObjects. Users who want to instantiate an object send an RPC to the master client. The master client can create GameObjects which are tied to the lifetime of the room. After that, a pointer to the GameObject is returned to the calling client so that it can further process the GameObject. It realizes a Mixed Reality text chat with the corresponding UI and utilizes Photon Voice to create a voice chat. VIAProMa is able to visualize remote participants as customizable avatars. The avatar’s position and head rotation is synchronized with the position of the device. The customization of the avatar is realized using custom user properties.
Since the code for VIAProMa is available on GitHub under an open-source licence, you can inspect and adapt this project and its implementation to create your own shared applications.